It’s that time of the year when I look at what the next year might have in store for mortgage rates.
It’s never easy to accurately forecast mortgage rates, and this past year was no exception.
The 30-year fixed ranged from a low of 6.08% in September to as high as 7.22% in May, and interestingly, is not far off year-ago levels today.
For reference, it ended the year 2023 at 6.61%, per Freddie Mac data, and averaged 6.60% last week.
So what will 2025 look like? Well, it’s anybody’s guess. But let’s look at some popular forecasts (including my own) to attempt to make some educated predictions.
Forecasts Expect Mortgage Rates to Improve, But Stay Elevated in 2025
First off, let’s start with the general consensus, which is somewhat positive on mortgage rates in 2025.
Like last year, most industry pundits and economists expect mortgage rates to ease in 2025, but remain elevated relative to levels seen in 2022 and earlier.
As for why, it mainly boils down to high government spending and still-sticky inflation. This means the government might need to issue more debt by way of Treasuries, with added supply hurting bond prices.
At the same time, if inflation turns up again, bonds will suffer that way as well. Of course, this all hinges on what actually takes place under the new administration.
I’m not fully convinced mortgage rates will go higher during Trump’s second term, even though they climbed initially during his first term.
One big reason why is that they already jumped about 100 basis points (1.00%) since September when it appeared he was the frontrunner.
So his possibly inflationary policies, such as widespread tariffs and tax cuts are already baked in. And if reality defies expectations, rates have room to move lower.
They can also come down if unemployment continues to inch up, as that has been the Fed’s chief concern, not so much inflation.
Anyway, let’s check out some estimates and go from there.
MBA 2024 Mortgage Rate Predictions
First quarter 2025: 6.6%
Second quarter 2025: 6.5%
Third quarter 2025: 6.4%
Fourth quarter 2025: 6.4%
As always, I compile a roundup of forecasts from the leading economists and housing groups.
I always like to check in to see how they did the year before as well, though it’s no indication of performance for next year.
First up we have the Mortgage Bankers Association (MBA), which last year predicted a range from 6.1% to 7%.
They actually expected the 30-year to be down to around 6.10% in the fourth quarter of this year, and perhaps would have been right if rates didn’t jump post-election.
In 2025, they are playing it very conservatively, with a very tight range of 6.4% to 6.6%. In other words, only 20 basis points of movement.
That seems a little too narrow to be taken too seriously, but anything is possible. Mortgage rates are pretty close to levels last seen in 2001.
And during that year, the 30-year fixed ranged from 6.62% to 7.16%. So it’s not out of the question.
But lately mortgage rates have displayed much more volatility and have seen a much wider range.
The one upside to this prediction is that more stability could lead to some compression in mortgage rate spreads, which could provide some relief.
At the moment, mortgage spreads remain about 100 bps above their long-term average, meaning MBS investors are demanding a premium versus government bonds.
Fannie Mae 2024 Mortgage Rate Predictions
First quarter 2025: 6.6%
Second quarter 2025: 6.4%
Third quarter 2025: 6.3%
Fourth quarter 2025: 6.2%

Now let’s take a look at Fannie Mae’s mortgage rate forecast, who along with Freddie Mac purchase mortgages from lenders and package them into MBS.
Last year, they expected the 30-year fixed to range from 6.5% to 7%, and end the year around 6.5%.
Not too far off, but it actually turned out to be too conservative. This year, they are a bit more bullish, anticipating a slow decline back toward 6.2%.
It appears to be a pretty safe forecast, though they do update it each month and I’m using their latest forecast dated December 11th.
They seem fairly optimistic, but not optimistic enough to put a 5 on the board. They’re also expecting a slow improvement over time like the MBA.
We know mortgage rates rarely move in a straight line up or down, so expect the usual twists and turns along the way.
Freddie Mac 2025 Mortgage Rate Predictions
First quarter 2025: n/a
Second quarter 2025: n/a
Third quarter 2025: n/a
Fourth quarter 2025: n/a
Next up is Freddie Mac, which a couple years ago stopped providing mortgage rate predictions.
They are the main source of mortgage rate data via their weekly Primary Mortgage Market Survey (PMMS).
But sadly no longer provide monthly forecasts or predictions for the year to come.
However, they do provide a monthly outlook so we can glean a little bit of information there.
Their latest edition mentions recent mortgage rate volatility, but says “as we get into 2025, we anticipate that rates will gradually decline throughout the year.”
So that’s a good sign, and in line with the other forecasts listed above.
They believe lower mortgage rates in 2025 should also lessen some of the mortgage rate lock-in effect plaguing existing homeowners, freeing up more for-sale inventory in the housing market.
In turn, these lower rates should boost inventory and lead to a slight increase in home sales next year.
Despite more inventory, they still expect home prices to continue to move higher, albeit “at a slower pace.”
Lastly, they forecast total home loan origination volumes to increase “modestly in 2025” thanks to more purchase loans and increased refinance applications tied to lower rates.
Many existing homeowners stand to benefit from a rate and term refinance if rates can get back to the low 6% range. And millions more will likely refi if rates drop into the mid-5s.
NAR 2025 Mortgage Rate Outlook
First quarter 2025: 6.0%
Second quarter 2025: 5.9%
Third quarter 2025: 5.8%
Fourth quarter 2025: 5.8%
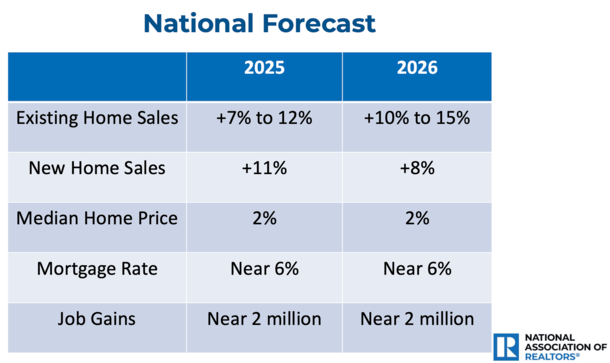
Now let’s look at the always entertaining forecast from the National Association of Realtors (NAR), which releases a monthly U.S. Economic Outlook.
That report contains their mortgage rate predictions for the year ahead, though the most recent one I could track down was from October.
But I also came across a presentation by NAR chief economist Lawrence Yun, which simply said mortgage rates will be “near 6%” for both 2025 and 2026.
Anyway, both forecasts are pretty bullish as they always tends to be. The real estate agent group rarely forecasts higher rates and often expects improvement in the year ahead.
And so this is no different than prior years. They expect the 30-year fixed to drift lower and lower and even go sub-6%.
Last year, they expected rates to range from 7.5% in the first quarter to 6.3% by around now. That turned out to not be too far off.
Wells Fargo 2025 Mortgage Rate Outlook
First quarter 2025: 6.65%
Second quarter 2025: 6.45%
Third quarter 2025: 6.25%
Fourth quarter 2025: 6.30%
Former top mortgage lender Wells Fargo also releases a U.S. Economic Forecast with all types of estimates for both 2025 and 2026.
They too are going with estimates that mirror those of Fannie Mae and the MBA, mid-to-low 6s.
What’s interesting about their forecast is that they have 30-year fixed rates bottoming in the third quarter of 2025 before rising in the fourth quarter.
Then going up a bit more in 2026. So according to them, 2025 might be as good as it gets for a while.
Granted, it all seems to be based on the trajectory of the 10-year bond yield, which they also see bottoming in Q3 2025.
Predictions from Zillow, Redfin, Realtor, and the Rest
There are a lot of predictions out there and I want to keep this article somewhat concise, so let’s discuss a few more before I share my own.
Zillow has said it expects mortgage rates “to ease, but remain volatile.” In other words, they’ll probably get better in 2025, but experience the typical ups and downs.
And they quite rightly point out that this volatility will offer risks and opportunities, so stay vigilant.
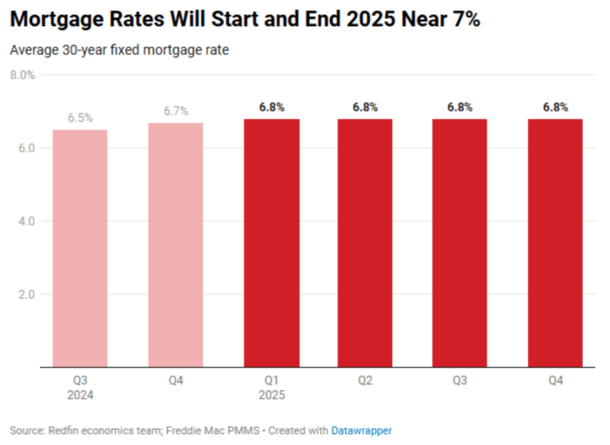
Redfin is pretty pessimistic, saying mortgage rates are likely to start and end 2025 around 7%, with an average around 6.8%.
They’re basing that on Trump’s tariffs and tax cuts and continued economic strength. But they do throw out an alternate theory where rates drop to the low 6s if those expected scenarios don’t unfold.
Over at Realtor, which is owned by News Corp. and licensed by NAR, they anticipate a lower 6.3% average in 2025, with rates finishing the year at about 6.2%.
They too adjusted their mortgage rate forecast upward to reflect increased government spending, and higher prices/inflation due to tariffs and lower taxes under a Trump administration and Republican-led Congress.
But like the others are unsure if and what actually comes to fruition, since speeches, words, proposals and reality are very different things.
The National Association of Home Builders (NAHB) also weighed in via their monthly Macro Economic Outlook.
They expect the 30-year to fall to 6.36% in 2025 from 6.73% in 2024, about a 40-basis point improvement.
Mortgage rates are top of mind for the builders who have gained a lot of market share lately since existing supply is suffering from mortgage rate lock-in.
Their rate buydowns have made deals pencil over the past few years, but come with a big price tag for the builder.
And finally, First American economists expect mortgage rates to fall between 6% and 6.5% during 2025.
The Truth’s 2025 Mortgage Rate Prediction
First quarter 2025: 6.5%
Second quarter 2025: 6.75%
Third quarter 2025: 6.25%
Fourth quarter 2025: 5.875%
Alright, now it’s my turn. I know mortgage rate predictions are for the birds, but it’s still worth throwing out there.
Last year I was pretty bullish and expected a 30-year fixed at 6.25% in the third quarter and 5.875% in the fourth quarter of 2024.
I was mostly right about the third quarter, but I failed to factor in the presidential election, which threw off my Q4 prediction.
Still, I take accountability and unlike the other predictions, I’m going to make adjustments going forward so my forecasts are less linear throughout the year.
In other words, not just lower and lower as the year progresses. That’s too obviously wrong.
That said, I expect an average rate of 6.5% in the first quarter as the recent run-up in rates doesn’t feel warranted. So a simple relief rally into the new year.
Then an uptick in the second quarter since mortgage rates always seem to be at their highest in spring, when home buyers need them the most.
But only worse by about a quarter-percent before falling again in the third quarter on economic weakness and increased unemployment.
And finally slipping below 6% in the fourth quarter, but only just below 6%.
The basic premise for me is that I see a weakening economy and don’t believe all of Trump’s policies will come to fruition, which are arguably already baked into higher rates.
For the record, I wouldn’t be surprised to see rates hit the high-5s during select weeks during other quarters as well.
So as always, there will be lots of opportunities for both home buyers and existing homeowners looking to refinance. Just keep your eye on the ball!
Read on: How are mortgage rates determined?
Before creating this site, I worked as an account executive for a wholesale mortgage lender in Los Angeles. My hands-on experience in the early 2000s inspired me to begin writing about mortgages 18 years ago to help prospective (and existing) home buyers better navigate the home loan process. Follow me on Twitter for hot takes.
Latest posts by Colin Robertson
(see all)


 Guide")
 Guide")